
Get started with Git and Github in under 10 Minutes
28.10.2018, last updated 20.02.2019 - Jay M. Patel - Reading time ~6 Minutes
Git is probably the most popular version control system being used right now, and if you have any experience with other version control systems like subversion than it’s strongly recommended that you go through this section since lot of concepts from other systems don’t directly translate to Git.
Git basics
You can create a local Git repository on your computer by either:
Clone an existing Git repository from a remote repository on internet (e.g. github.com)
Designate a local directory currently not under version control, and turn it into a Git repository.
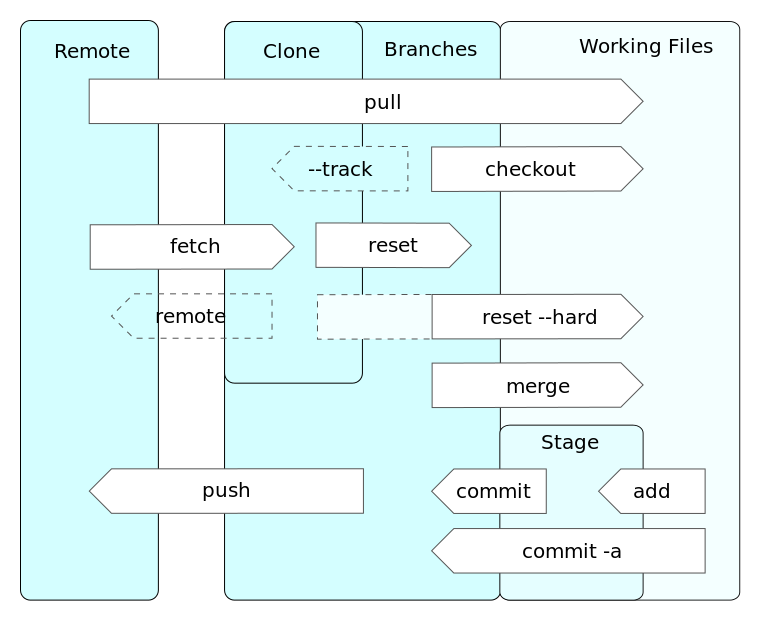
Figure 1: Git operations
This local git repository is the middle layer in above figure and is where Git stores the metadata and object database for your project. This is the most important part of Git, and it is what is copied when you clone a repository from another computer.
You are said to “pull” when bringing a file from a remote git repo into your working directory/file which is simply single checkout of one version of the project. This will bring the file from compressed database in the Git directory and placed on disk for you to use or modify. Pull will fetch the changes and merge it into a local branch of the same name.
Alternately, you can checkout from your local git directory into working directory which will fetch the changes but doesnt merge them (you can do it later if you want).
The Stage in the above figure refers to a file in your Git directory which stores information about what goes in your commits; it is also called a staging area.
A sample Git workflow is:
Modify files in your working directory and
Selectively “add” the changes you want to be part of your next commit to the staging area.
“Commit” the files in the staging area to store that snapshot permanently to your Git directory. You can use commit -a to automatically stage files that have been modified or deleted. It is customary to include a short commit message to briefly explain the changes you are committing.
“Push” the changes from the local git directory to the remote repository hosted by your organization or to public git repos such as github.
If a particular version of a file is in the Git directory, it is considered committed. If it has been modified and was added to the staging area, it is staged. And if it was changed since it was checked out but has not been staged, it is modified. The figure below explains the lifecycle of a file in Git.

Figure 2: Life cycle of files in Git
Like most version control systems, Git also allows an user to diverge from the main line of development and continue to do work without messing with that main line by using branches (the default one is master).
Install Git
Download Git by going to https://git-scm.com/downloads
Depending on the option selected during installation, your environment variable will already be set so that you can open windows command line and check the version of your git by entering the command below.
git --version- When using Git for the first time, make sure you set the username and user email since this will be used for all the commits.
$ git config --global user.name "Jay M. Patel"
$ git config --global user.email jaypatel@example.com- Check your settings by entering
git config --listUseful Git commands
The figure below shows the type of git commands we will need to perform basic operations.
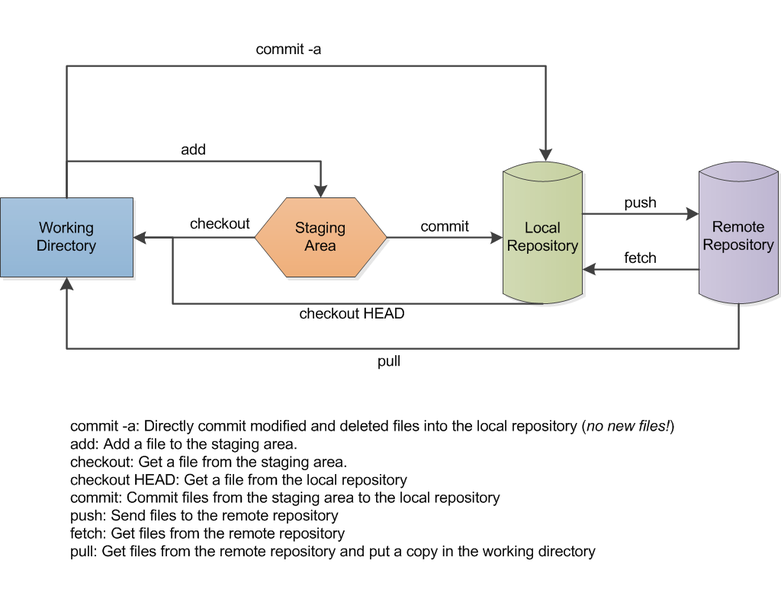
Figure 3: Summarizing Git operations
- Create a new repository in an existing directory by using
cdto select directory of your choice and using the commandgit initto initialize a git repository.
git init- Clone an existing git repository into a directory:
git clone https://github.com/jaypat87/Physicochemical-Property-Prediction.git- Setting up remote repo:
git remote add origin https://github.com/jaypat87/jaypat87.github.io- Changing the url of an existing origin:
git remote set-url origin https://enter_url_here- Check if remote repo is the one are what you want:
git remote -v- As an exmaple, you should get this as output:
origin  https://github.com/jaypat87/jaypat87.github.io (fetch)
origin https://github.com/jaypat87/jaypat87.github.io (push)- Once this is set, you can pull from remote master by:
git pull origin master- Check if there are any changes:
git status- To add files to the staging area:
git add -A
# or
git add .- Commit the changes to the local repo. if you do just git commit with “-m” then put a message down, enter esc and to type :wq to get out of the screen.
git commit -m "put a commit message here"- Push the changes to the remote repo
git push origin master- If you have to pull from a remote repo in case of two projects with unrelated histories aka which started their lives independently, and now you want to merge them, use the command allow-unrelated-histories
git pull origin master --allow-unrelated-histories- At any time, if you want to get back to main branch
git checkout master- Undoing any change: This can be done by advanced usages of
revertandrebasecommands and is beyond the scope of this tutorial and readers are referred to this blog post on github for more information.
Git Branches
In all the git commands above, we have assumed that you were only working on one repos having one branch; however, we know that most version control systems including Git have branching support to make it truly a tool useful for collaborative software development among multiple team members.
- Create a new branch
git branch testing- Switching to a newly created branch
git checkout testing- Push these changes to remote repo
git push origin testing- Merging changes in dev once you are back in master branch
git merge testingPush this to the remote when you are ready.
To see the last commit on each branch:
git branch -vGitignore file
A gitignore file specifies which files Git should not track. Readers are encouraged to go through a collection of useful gitignore files examples and go through the Git documentation for more information.
Collaborating on Github
If you dont have access to push to a repo, then fork it on github, make whatever additions you would like and open a pull request. The owner of the original repo can either suggest more changes or accept and merge your change into the main repo.
In order for them to keep their forks up to date with upstream or (main/master) open git bash and enter:
git remote add upstream https://upstream_git_urlPeriodically, fetch changes from upstream
git fetch upstreamTo checkout the master branch of upstream repo
git checkout upsteam/masterAt this point, you should get a note
Note: checking out 'upstream/master'.

You are in 'detached HEAD' state. You can look around, make experimental
changes and commit them, and you can discard any commits you make in this
state without impacting any branches by performing another checkout.

If you want to create a new branch to retain commits you create, you may
do so (now or later) by using -b with the checkout command again. Example:

  git checkout -b <new-branch-name>
You can assign this detached head state to a new branch by:
git branch my-temporary-workCommit whatever changes you need to do, and come back to master by
git checkout masterAt this point, you can merge by
git merge my-temporary-workAnd push the changes to your origin repo by
git push origin master